
Creating Sofia the First with Foo Foo Threads
/Welcome back to our costume tutorial series. Today we have Sarah here to share her gorgeous Princess Sofia dress created with the Tasha Dress by Foo Foo Threads. It is adorable, and I can imagine many princesses from this pattern! (*Don't miss out on the pattern for the Sofia Emblem HERE.)
------------------------------------
Hello! This is Sarah again, and I am back today to share my tutorial for making a princess Sofia Dress. My daughter decided on Princess Sofia for her third birthday party and specifically asked for a "pink Sofia dress". So after a bit of googling to figure out what a Sofia dress was all about, I set out looking for the perfect Sofia pattern. This is what we ended up with:


No, it is not pink, but she's three and still iffy on her colors...
The first hurdle was finding a pattern that would work for the Sofia dress. I loved the look of the bodice of her dress and that was the driver for the pattern I picked. I ended up using the FooFoo Threads Tasha dress because I thought the fitted bodice and sleeves were very close to the inspiration dress and were just adorable, plus it looked like it would be easy to embellish. I also loved that the bodice was shirred in the back; I figured she would get a lot more use out of it with a little room to stretch!

I used a 100% cotton print for the dress; I wanted something that I could wash and that would last through multiple wears. And it has! This is an everyday wear item in our house (she wore it to the movies the day I took these pictures.) I chose a purple tonal dot print to mimic the pearl embellishments on the inspiration dress. The underskirt was made out of white broadcloth, chosen because it was lightweight and I did not want to add a lot of bulk and weight to the dress. I picked up ribbon, braid and pearls at the local fabric store to finish out my supplies.

A lot of the dress was made exactly according the tutorial for the pattern, so I will just be summarizing the changes I made to the dress to make it a Sofia. The bodice and sleeve portions were cut according to the directions in the pattern, but I cut a second front bodice piece to act as a lining. Prior to sewing anything, I laid out my design for the braided embellishment on one bodice piece. Once I had the braid where I wanted it, I put a dab of quick dry glue on my finger and ran my finger under the braid to quickly tack it down.

Then I sewed the braid in place using the cording foot on my machine.

Next I marked my vertical lines for the pearl trim using a disappearing ink marker and ruler. I spaced them evenly from the center of the braided trim.
 |
| You can barely see it, but there are lines there! |
Using the cording foot and a zigzag stitch, I sewed the pearls to the front of the bodice using the marked lines for reference.

 |
| Leave a bit of room at the top to allow for the seam allowance. |
 |
| Finished front bodice. |
Once the pearls and braid were attached, I sewed the two front bodice pieces together at the neckline using a 1/2" seam allowance (because the original pattern called for a 1/2" folded edge as the top finish). From there, I finished the bodice as directed by the tutorial, treating the bodice as one piece.

A huge part of getting the "Sofia" look is the scalloped skirt. I looked at the measurements listed for the underskirt and overskirt in the tutorial, but ended up just measuring how long I wanted the dress to be and cutting my fabric to that length. For the overskirt, I used the entire width of the fabric (to make it very full) and cut two 15" pieces. For the underskirt, I also used the entire width of the fabric and cut two 16" pieces. Mine was a size 4 for reference.
I divided and cut each overskirt piece into three equal pieces.

Once I had the six rectangles cut, I used a large plate (yep, it's time to get technical!) to trace out a curve on one.
I ended up not liking the shape, because it was too round, so I curved the sides up more sharply to look more oblong.

When I was done, I stacked the cut one on top of the other five and used it as a template to cut the rest.

Note: I had originally tried to do the front and back as only two pieces, but when I finished off the edges and added the trim, it got a weird bubble (for lack of a better word) in the corners. So I cut them into six pieces and it turned out much closer to what I had in mind.
Once all of my curved pieces were cut, I finished off the straight edges with a serger.

Then I applied single fold bias tape to finish off the curved portions.


I did this because it is a good way to maintain the curve and get a really nice finish. You could fold it over and iron it, but I have a hard time keeping my curves from getting wonky that way.
After the edges of all of the pieces are finished, I sewed the six pieces together along the straight edges.

Once the pieces were joined, I again used my cording foot and a zigzag stitch to attach pearl trim to the edges of the scalloped portion.

The last step to for getting the "Sofia" look was to place the emblems. I used my silhouette machine software to make a loose translation of the Sofia emblem. Then I cut the emblems out of iron on transfer material and applied them to my skirt.

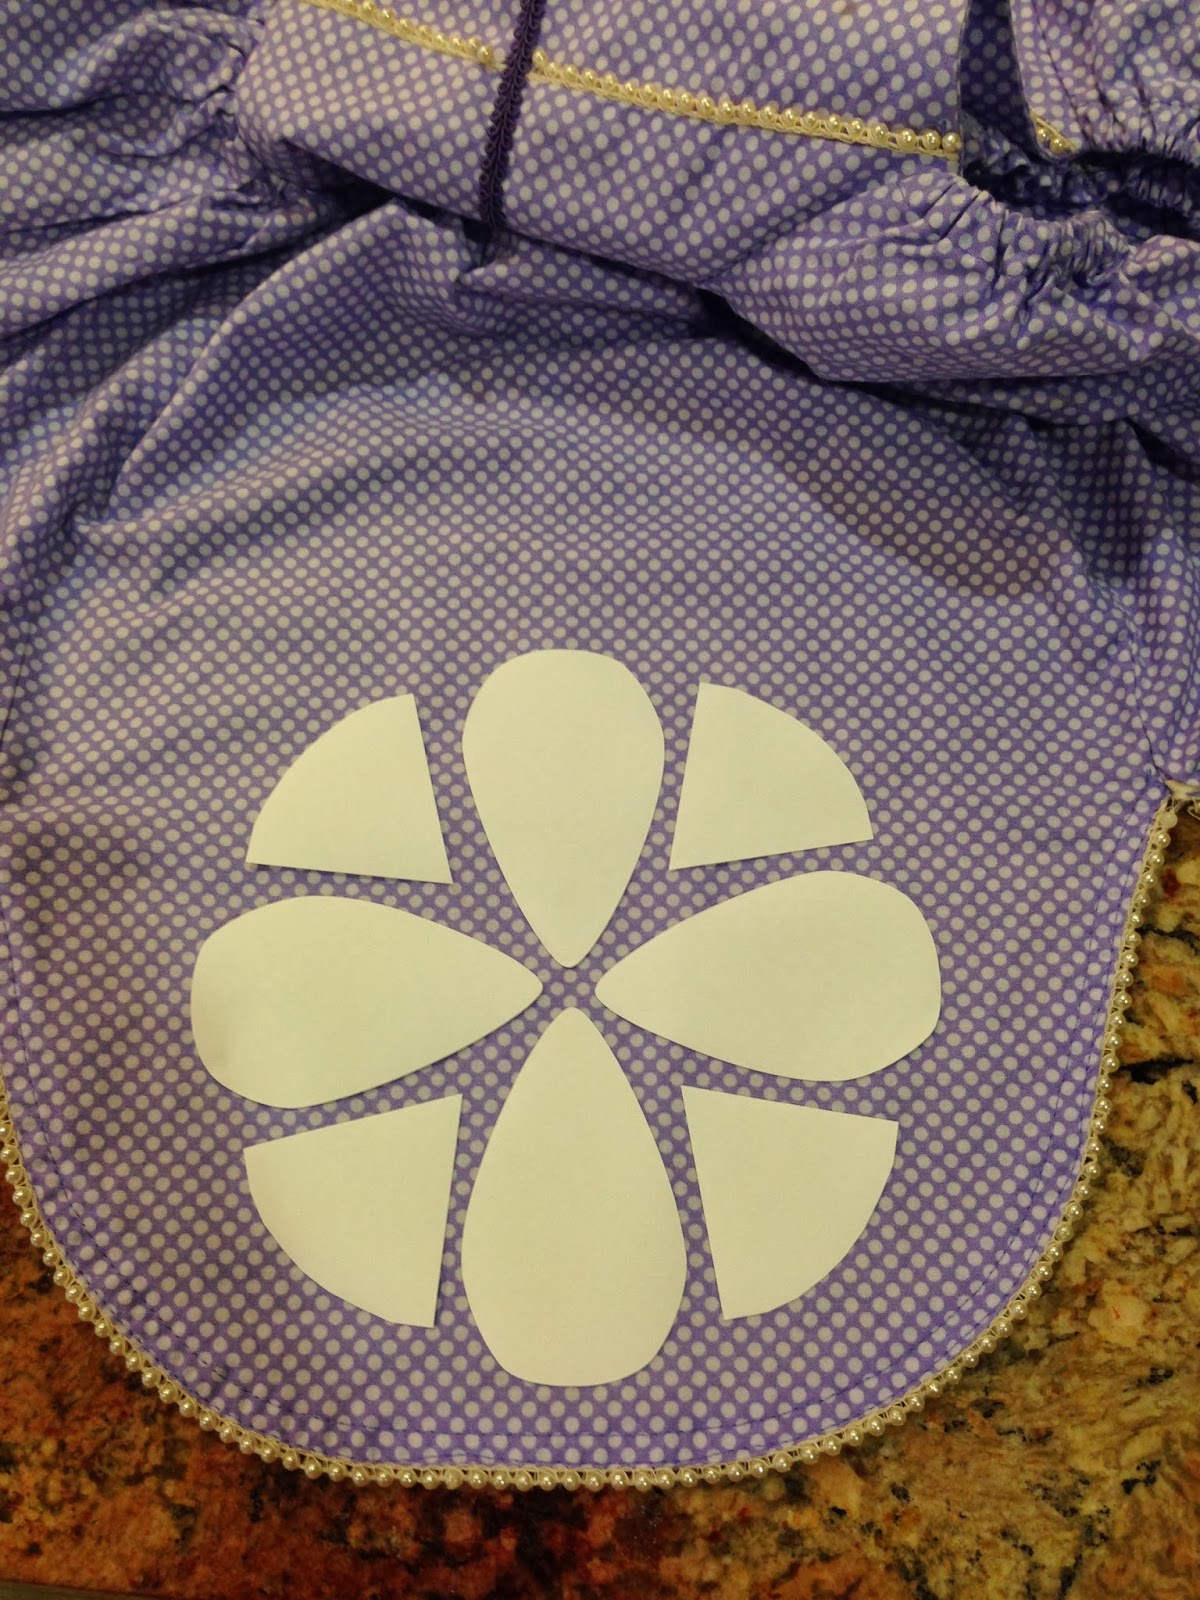


I use Jet-Opaque II dark heat transfer paper to make mine. (I buy it on amazon.com)

Please beware, not all iron on transfer material is equal. While making t-shirts for our last Disney trip, I ran out of my Jet-Opaque and bought a different brand from my local craft store. After the first wash, it turned yellow and the design started to flake off. So, if you are new to a brand, I would encourage you to do a test run on scrap fabric and make sure it performs well!
You could also use fabric, felt, iron-on vinyl or other materials to make your emblems. And, if you don't have a silhouette machine, no worries, I am including the template for the emblem I made for you to trace and cut out.
Once you have the overskirt complete, you are almost done! For the underskirt, I simply sewed the two pieces together, made a narrow hem along the bottom and sewed purple ribbon along the bottom.
Then, I completed the dress by sewing the skirt to the bodice and shirring as directed by the tutorial.


Note: For the original dress I made, I used pearl trim attached to bias that I found at a local fabric store. It is a bit pricey and hard to find (Hancock's does carry it for $1.99 per yard) so I revised my method slightly for this tutorial. But, it is an option if you are not comfortable applying the bead trim or do not have a cording foot. (You can use a zipper foot to apply it.)
I hope you enjoy making your Sofia inspired dress as much as I did! I'll see you soon!
Sarah
------------------------
Thank you so much Sarah - that is so perfect! No Sofia is finished without the iconic emblems, and Sarah has generously created a pattern for YOU. Head over to our facebook group and download the file!


