
Tutorial: Upcycled Leg Warmers for Valentines Day
/Hold onto your socks!!! Today we have the ever talented Kara sharing a great tutorial for easy upcycled leg warmers. Add a little heart or embellishment and your holiday sewing for Valentine's Day is all set. You may never look at all of those sweaters hanging in your closet the same way again!

How To Make Leg Warmers
A Tutorial for Upcycled Leg Warmers by Kara Orr
Gather your materials.

Step 1:
Let's begin with a sweater, go to Goodwill if you can't find one at home. If your sweater has long sleeves, cut the sleeves off the sweater and skip to Step 7. If your sweater has short sleeves or the sleeves can't be used, continue on with the directions as follows. Cut the sleeves and front or back off the sweater.

Step 2:
Measure the child you are making leg warmers for. For my DD, her ankle to knee measurement was 8". Measure from the bottom of the sweater to your desired height and cut. I measured 8" from the bottom of the sweater and cut the top portion off.
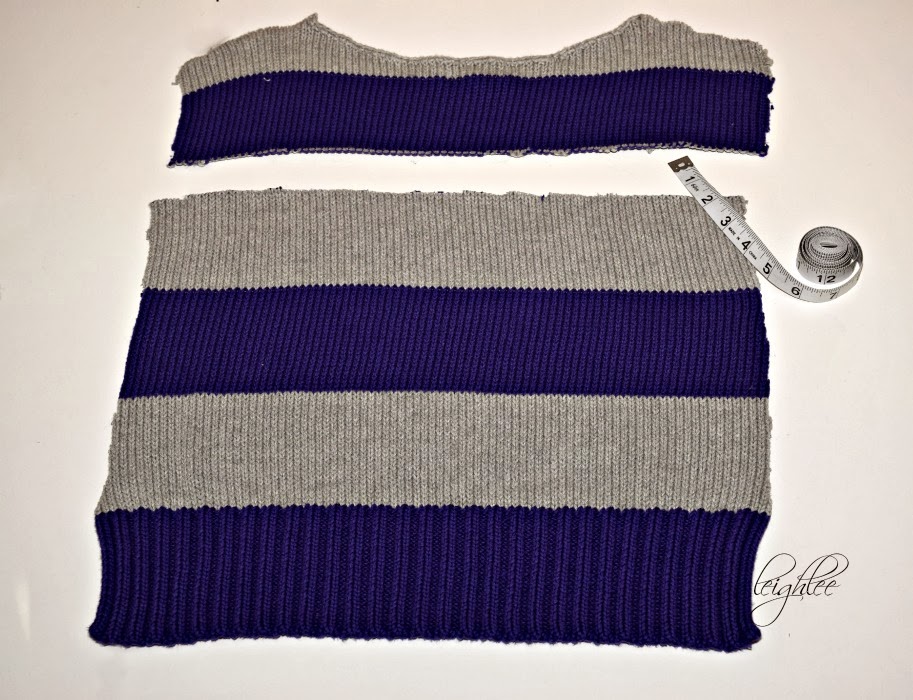
Step 3:
Measure the circumference of the top of the calf just below the knee. The circumference of my DD's is 7 3/4". Make sure the legging is wide enough to go around the leg and also have some extra room. The measurement of my cut leggings is 17h X 14w, cut 2.

Step 4:
Fold the width of one leg warmer in half, with right sides facing each other. If you have a patterned fabric, be sure to match up the pattern at the seams. Pin the leggings right sides together.

Step 5:
Sew your leg warmer together with 3/8" seam allowance. I used a twin needle because the sweater is stretchy. If a regular needle is used, be sure to adjust the stitch length to accommodate for the stretch of the fabric, or use a stretch stitch. If you need to know more about sewing with knit fabrics click here.

Step 6:
Serge or zig zag stitch to finish the seam. It is also necessary to serge or zig zag stitch any other raw edge. The top of the legging in this picture is raw and needs to be serged. The bottom of the leg warmer has a finished edge, so it doesn't need to be serged.

Step 7:
Measure the circumference of the leg, just below the knee. My DD measured a circumference of 7 3/4" just under the knee. Cut your elastic 1/4" shorter than the measurement. The elastic length will determine how tight or loose the legging will be( don't forget that some slack will be taken up when the ends of the elastic are sewn together).

Step 8:
To create a casing, fold down the top edge and iron. I folded the top edge down 1". Sew the casing, leaving an opening to insert the elastic.

Step 9:
Do you have a Bobkin? Get one! This was my first experience with the Bobkin and I was very pleased. The Bobkin threads elastic through a casing, pretty nifty!

Step 10:
Using the Bobkin, insert the elastic into the opening and thread through the channel. If you do not have a Bobkin, I recommend using 2 safety pins. One safety pin gets attached to the elastic and guides it through the casing. The second pin is for the opposite end to ensure the elastic doesn't pull through the casing (been there, done that). Just pin the elastic to your garment at the casing opening.

Step 11:
Thread the elastic through the casing until it comes back out the opening. Sew the elastic together at the ends. Sew up the hole you left in the casing.

Finished! Fancy that!
I added cute little felt hearts for Valentine's Day. I free hand cut the hearts, then attached them with embroidery thread.

They are ready to be worn by your little. (If you love them and feel the need to make your own, it is the exact same process. Go for it!)

I also made the Off The Shoulder Top and Tunic by Everything Your Mama Made and More. I think it turned out adorable. I used sweatshirt fleece so that it would be warm and cozy during the winter months. There is also a mama version, that's my next project!


I hope you enjoyed the tutorial! Stay cozy in those leg warmers! This would be a great Valentine's Day gift for teenagers and their friends.


