
The Maddalie Dress by My Little Plum Cake
/Today we continue our look at some perfect Easter/Spring dresses as we share the ever adorable brand new Maddalie Dress Pattern from My Little Plum Cake. This dress has some unique features that will add a different look to you daughter's wardrobe. You can dress the pattern up or down to fit the occasion, and with a knee length hem, it is perfect for everyday wear. Check out these adorable examples by Crystal and Carrie and grab the pattern for yourself. Make sure to enter to win a copy bellow!
-------------------------------------------
Hi! It’s Crystal from
That’s What She crafted and I’m SUPER excited to give you a little
review-da-lee-do of the Maddalie Spring Dress from My Little Plumcake’s new
Spring line!

I was lucky enough to be able to pre-test and test this
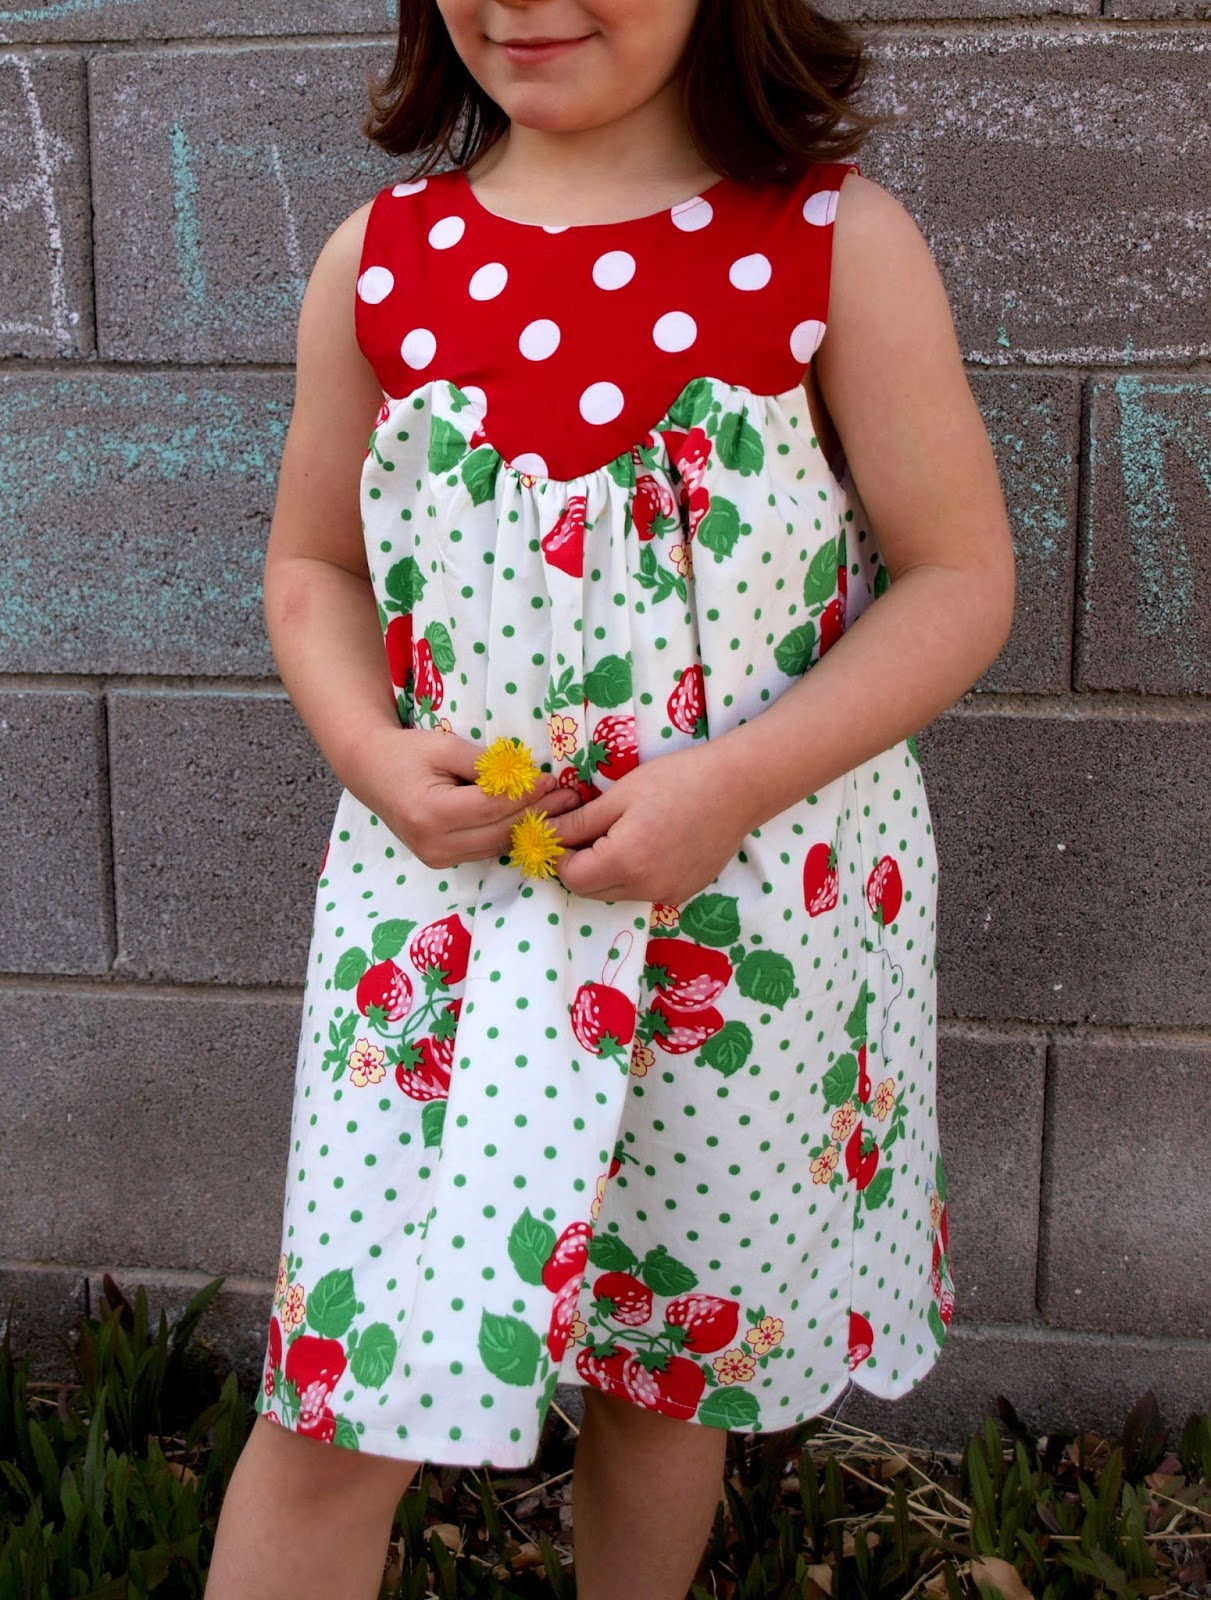
dress and its one of my favorite looks for this spring. The pattern features a unique swoopy neckline
with a 2-3 button closure and is fully lined.
If you want to get creative, you can even lengthen the lining to peek
out just a bit. I know; now I’m getting
all CRAZY! Don’t worry you can do it!

The Maddalie is rated as a beginner/ advanced beginner and I
think it leans more towards the advanced beginner side. None of the techniques used are difficult by
any means, but I’m sure a true beginner would learn something new from this
tutorial. There is some hand sewing
(stop your groaning and pick up that darn needle), but it makes for a nice
finish and is totally worth it. Besides, you can hand sew while watching your
favorite TV show and resting your rump in a comfy chair, covered in a
blankie...aaaaaaah. There is also some front gathering that requires
a bit of finesse, but taking our time and putting care into our work is what
separates the “homemade” from the “handmade” .
Michelle (The My Little Plumcake Designer) takes pride in
her work and you can really tell while you read and sew. The pattern pieces line up, the instructions
are clear, and the design is very unique. I’m sure you’ll be happy with your
finished product and so will the little
girl that wears it.
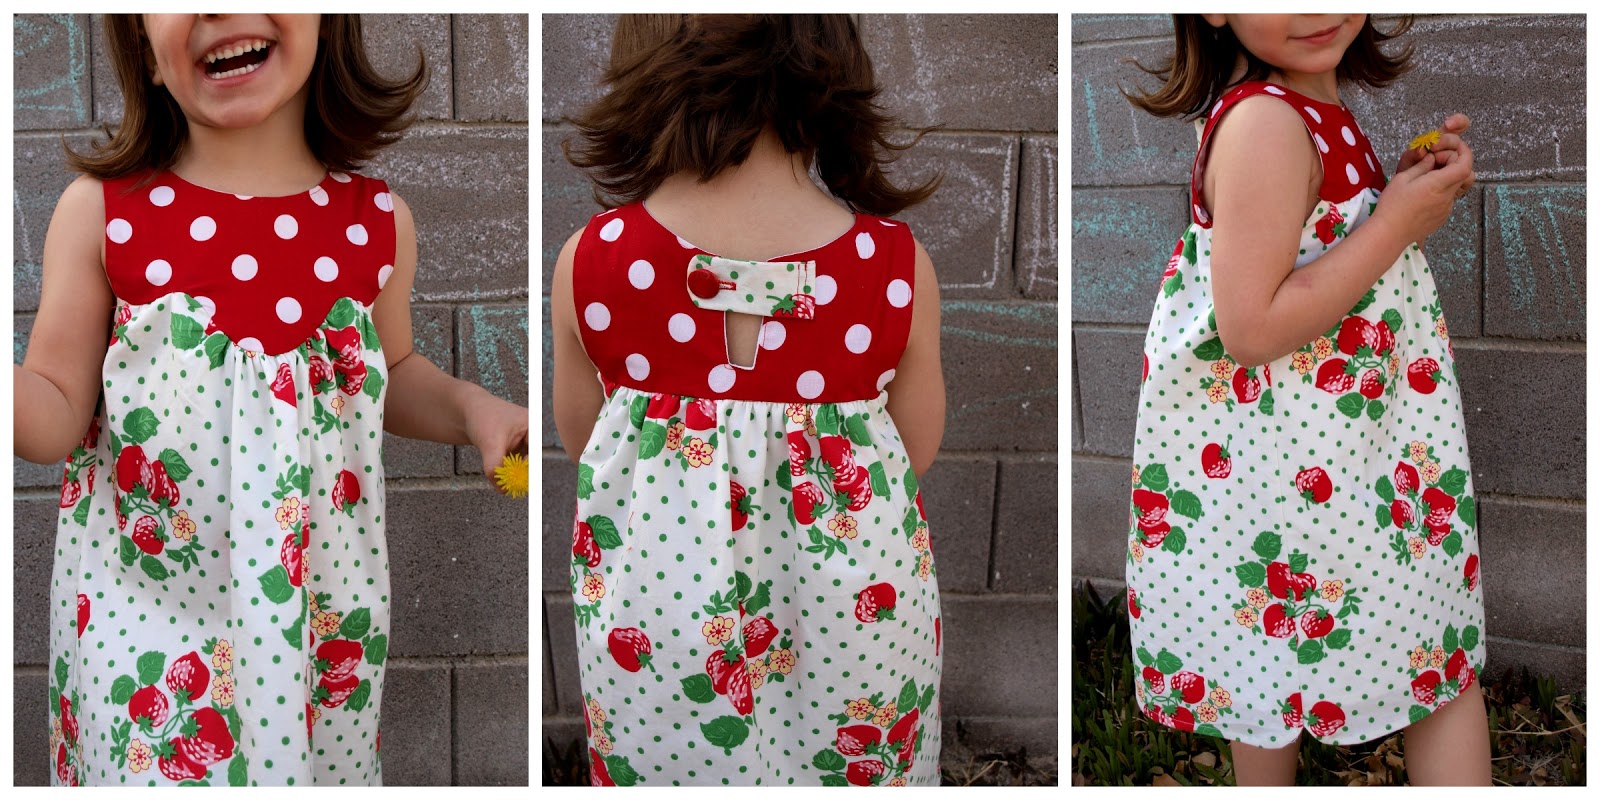
*FYI , the back button tab was a "fix it" when I forgot to sew in my button loops and didn't realize it until the very end. I'm not perfect...fabulous, but not perfect*
-Crystal-
-------------------------------------------
Hey all! Carrie here, from Beri Bee Designs, here today to share with you a sweet little dress for spring (or anytime really), the Maddalie by MyLittle Plumcake.
This is my first time trying a pattern from MyLittlePlumcake and when I saw how cute this was I just knew I had to make one for my daughter.

I have to say although they say this is geared towards beginner to advanced beginner I am inclined to disagree. I would say it leans more towards an intermediate level. I have been sewing for over 10 years and still had a few areas that I didn’t feel very confident about since they weren't things I had tried before.
I think the overall simplicity of the style is perfect! It can easily be dressed up or down based on your choice of fabric. Since I’ve already finished an Easter dress, I went with a more casual lightweight denim and I love the result!
This dress features a curved hem at the sides which is something you don’t see everyday and may not be comfortable with, but MLP does a great job of explaining a quick gathering technique that helps add the curve to the hem beautifully!

The back has a 3-button closure using fabric loops. Skinny tubes can be hard to turn, so here's my little trick for making it easier! Thread a skinny piece of ribbon into the tube after you stitch right sides together and secure it at the end with a few stitches. Then you can just gently pull the ribbon through and the fabric tube turns right side out- voila!
(I’ll try to get a few quick pictures with a tutorial on my blog this week if that doesn’t make sense to anyone.)

I thought the yoke construction was very well explained and went together nicely, with a professional finish and all seams enclosed. Up until this point I was just cruising along but when it came time to attach the finished skirting to the yoke I felt like I had my seam ripper out more
than I was actually sewing. I admit I had originally printed this out in black and white so the pictures were a tad difficult to make out. When I got hung up here, I pulled up color photos to see if that would help me get over the hurdle, but I learned it wasn’t just the black and white that made it hard for me to decipher. It would have really helped a visual learner, like myself, to see a few more photos illustrating this section - just to help it 'click'.
To simplify the curved bodice for myself, I ended up sewing the middle section and then just ignoring the curves on the outside edge of the yoke - easing it into a straight line. While this isn't the proper construction, it seemed to give me the same look on the outside that I was expecting while still maintaining my sanity. I’m not saying it can’t be done, but the curves and I were not getting along on this day. Don't worry, there are clear markings on the pattern for what you gather, some days everything goes smoothly, and some days you and your seam ripper become best friends so you 'make it work'.
I am also a fan of topstitching, so although it didn’t call for that, I did topstitch along both the front and back where the skirting attaches to help it lay better, completely a matter of personal choice.
In the end this took about 2.5 hours from start to finish, uninterrupted so it might be something you take on after the kids are in bed when you have some quiet time to really focus.

Even with the few bumps along the way, I really love how this turned out and I will make more!
My daughter said she loved it too, and we had a great time getting a few pictures for you – she even broke out a few ninja moves for me while we were out! Haha!

This is my first time trying a pattern from MyLittlePlumcake and when I saw how cute this was I just knew I had to make one for my daughter.
I have to say although they say this is geared towards beginner to advanced beginner I am inclined to disagree. I would say it leans more towards an intermediate level. I have been sewing for over 10 years and still had a few areas that I didn’t feel very confident about since they weren't things I had tried before.
I think the overall simplicity of the style is perfect! It can easily be dressed up or down based on your choice of fabric. Since I’ve already finished an Easter dress, I went with a more casual lightweight denim and I love the result!
This dress features a curved hem at the sides which is something you don’t see everyday and may not be comfortable with, but MLP does a great job of explaining a quick gathering technique that helps add the curve to the hem beautifully!
The back has a 3-button closure using fabric loops. Skinny tubes can be hard to turn, so here's my little trick for making it easier! Thread a skinny piece of ribbon into the tube after you stitch right sides together and secure it at the end with a few stitches. Then you can just gently pull the ribbon through and the fabric tube turns right side out- voila!
(I’ll try to get a few quick pictures with a tutorial on my blog this week if that doesn’t make sense to anyone.)
I thought the yoke construction was very well explained and went together nicely, with a professional finish and all seams enclosed. Up until this point I was just cruising along but when it came time to attach the finished skirting to the yoke I felt like I had my seam ripper out more
than I was actually sewing. I admit I had originally printed this out in black and white so the pictures were a tad difficult to make out. When I got hung up here, I pulled up color photos to see if that would help me get over the hurdle, but I learned it wasn’t just the black and white that made it hard for me to decipher. It would have really helped a visual learner, like myself, to see a few more photos illustrating this section - just to help it 'click'.
To simplify the curved bodice for myself, I ended up sewing the middle section and then just ignoring the curves on the outside edge of the yoke - easing it into a straight line. While this isn't the proper construction, it seemed to give me the same look on the outside that I was expecting while still maintaining my sanity. I’m not saying it can’t be done, but the curves and I were not getting along on this day. Don't worry, there are clear markings on the pattern for what you gather, some days everything goes smoothly, and some days you and your seam ripper become best friends so you 'make it work'.
I am also a fan of topstitching, so although it didn’t call for that, I did topstitch along both the front and back where the skirting attaches to help it lay better, completely a matter of personal choice.
In the end this took about 2.5 hours from start to finish, uninterrupted so it might be something you take on after the kids are in bed when you have some quiet time to really focus.
Even with the few bumps along the way, I really love how this turned out and I will make more!
My daughter said she loved it too, and we had a great time getting a few pictures for you – she even broke out a few ninja moves for me while we were out! Haha!


