
Tutorial: Obi Belt
/Belts are such a fun fashion accessory, they can quickly transform an outfit and are an easy way to pull a look together. There are some belt styles that you can easily sew up yourself to add some more punch to your wardrobe with out breaking the bank - one of these is the Obi Belt.


While the trend may have hit big in 2011, they are still showing up on runways for 2014 Source: Josie Natori Spring 2014
Kara is sharing a fun and easy Obi Belt Tutorial with us today - have fun with this and add some new style to your closet!
-------------------------

Obi Belt Tutorial
by Kara Orr
The month of "Self Care" Sewing has been a blast! I hope you have enjoyed reading the posts and seeing all of the pictures of our lovely contributors. I thought it would be so fun to make an Obi style belt to go along with some of my new fun outfits!
Start off with fabric of your choice, I found very thick fabric that I thought would work great. I didn't have a specific outfit in mind when I found my fabric at JoAnn's in the clearance remnant bins, but for $3 I figured I would find something to match.
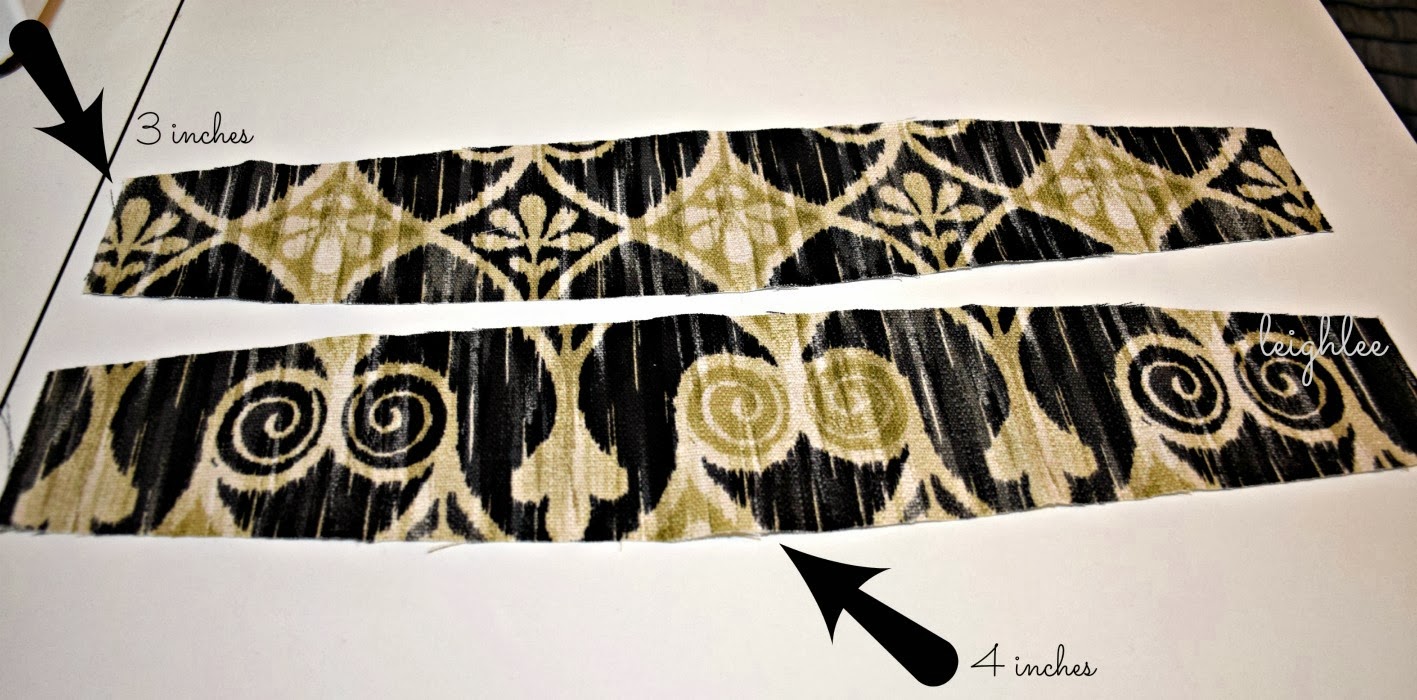
Obi belts are meant to be wide in the front, go around the back, and tie in the front. Start off with a basic curved shape for the belt. My belt measured 4 inches in the middle and tapered down to 3 inches on the sides. You can easily draw a template to help cut the pieces.
Place the belt pieces right sides together and pin. Sew the two long curved edges.

Use a Bodkin to turn the belt right sides out. Attach the Bodkin to one short side and insert it into the opening.

Push the Bodkin all the way through to the opposite opening, turning the belt right side out.

Iron the belt. Iron the short edges of the belt toward the inside of the belt to make a finished edge.

Topstitch the long edges of the belt.

Cut 2 one inch wide strips to make bias tape. The length of the bias tape depends on your waist. The ties need to wrap around the back of your waist and tie in the front. I measured around my waist and added 10 inches for the bow.

Fold the bias tape in half and iron.

Make bias tape. Leave one end raw and finish the other end. To finish the end, fold in twice and iron.

Topstitch the edges of the bias tape.

Insert the raw edge of the tape into the short open side of the belt. Center the tape and attach. Topstitch.


I also made my top and pants using patterns from Jocole. The top is the Classy Cowl Neck Bodice using the Mix and Match Series and the pants are the Ladies Wide Leg Pants.

I'm really pleased with the way my outfit turned out. I made the pants from dark denim that has a little stretch and the top is a slub knit. This outfit it cute enough to wear to ball games or for date night. Tonight, I wore it to have dinner at Chuy's, my favorite Tex-Mex restaurant. I just love it when an outfit comes together, and the best part is that I made it! I hope you get to do some Self Care Sewing very soon.


