
New Spaces for a New Year
/This is your last chance to organize that space before all your BundleUP! patterns and fabrics take over ;o) Hahahah, but I do have to say that I love how much easier to put together and complete projects with my newly cleaned space. I showed you a transformation of chaos to functionality, Robin showed you an amazing way to re-purpose thifty finds to make a unique and fun space..... now Sarah is here to show us both up by sharing her space that 100% deserves to be in a magazine!!!!! Hahahahahah, no, we all have spaces that are perfect for us, but she certainly knows how to add an extra flair of style, and we hope that she inspires you as well!
------------------------
This is my before (ughhhhh):


As I approached the New Year, I thought about all of the things I would like to get accomplished and one huge thing on my list was my sewing room. It is one of those projects that I had let go for far too long and was getting to the point where it was both overwhelming and stifling. I felt like I couldn't even work in it because it was driving me so crazy with the disorder. And that's a shame because I get a lot of solace and joy out of my sewing room. It is my place of creativity and empowerment, my happy place...or at least it used to be.
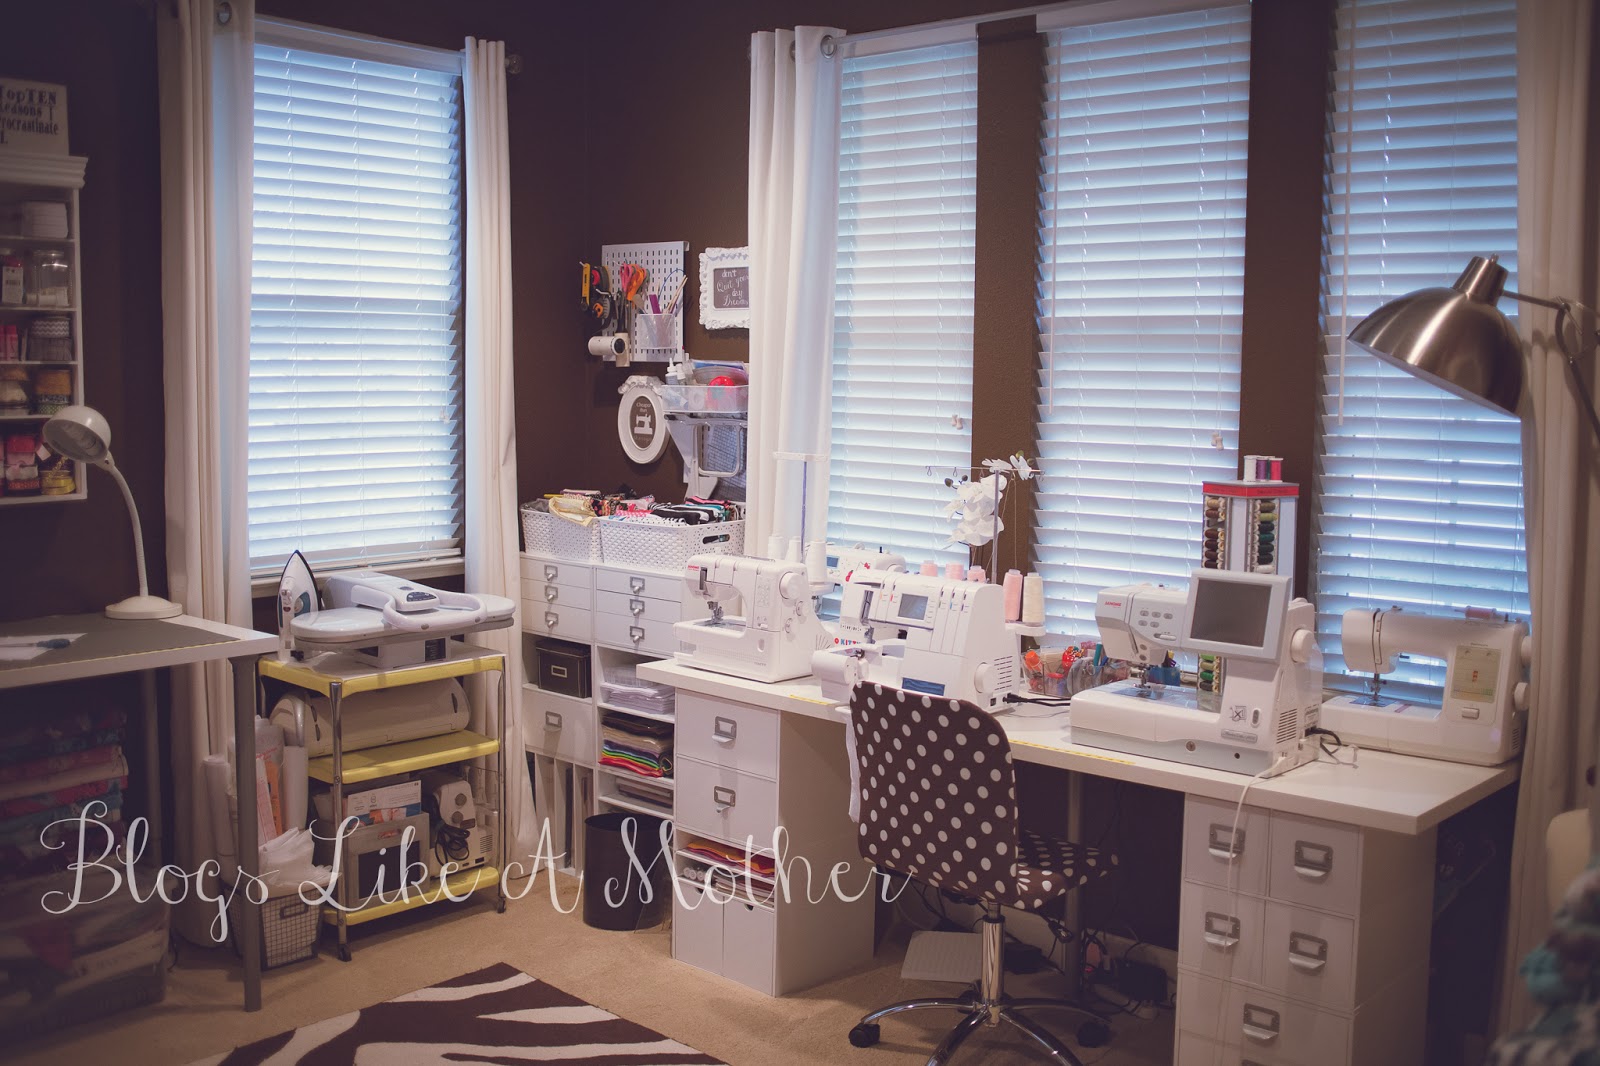
I set out to completely organize the room and I think I pull fit off pretty well. Here's what I did...


I started out by doing some general decluttering of the room; getting rid of random Joann Fabric bags with one or two things in them, throwing out packaging from fabrics ordered online and de-scrapping. I went through an entire mountain of scraps and picked out the useable ones and gave them away. It gave me a lot of space that I really needed to get back and really decreased the cluttered look of the room just by getting rid of the scraps. I kept some scraps; those were folded and put into bins.

I also rearranged my main work table. I previously had the table top (from Ikea) on top of storage cubes (the recollections collection from Michaels) and it just wasn't working. With 2 cubes stacked it was too low for me and with three, it was too high. So I took the cubes out completely and put them in the corner, then added legs to the table and was able to adjust it to a great working height for me.


The top of the table has my rotary cutting mat and a bin to hold my current projects, plus an adhesive measuring tape that I find very useful for measuring various items. I also took the task lamp off of my sewing table and added it to the work table to give myself a little more light. Above the table is a shelf (also from the recollections collection at Michael's) that holds all kinds of my ribbons and trims, plus containers of buttons and my friendly sewing room gnome. I also added my grandmothers iron and a button picture I saved from her home after she passed and a funny little sign about procrastinating that a dear friend (who clearly knows me well) gave me. I still have a little work to do on the shelf (like going through the rest of my grandmothers buttons and putting them in the containers) but it is a great start!

On each side of the work table, I arranged my two carts. The blue one is from Ikea and the yellow one I bought off of eBay a few years ago. The Ikea cart has my embroidery stabilizers and ironing supplies in the top, my camera and lenses in the center and some paper patterns and a few other misc items in the bottom. The yellow cart holds my steam press and iron on the top and my cricut and silhouette (missing because I was using it) in the middle, then some paper and my in-need-of-repair-serger on the bottom. I love the carts because they give me a lot of storage space but are mobile, functional and pretty all at the same time.

Since my fabric hoard was quickly overtaking all of my room, I also addressed my fabric storage. I ruler folded as much as I could fit onto my cabinet (from Ikea) and then filled up some stacking bins (from Joann fabric) with the overflow. I'll be honest...I also filled 2 large bins that I pulled into another room and are earmarked for de-stashing. In the corner between the cabinet and the wall, I have two stacking cubes with my fleece in them and some additional knit fabric on stacked on top (not ideal, but I am getting there!)


I also have a tension curtain rod mounted between the cabinet and the wall that I use to store my patterns. I started out with some hangers that had clips on them, but found them really bulky. So I switched to some S hooks with clip hooks hanging off of them. I can fit several clip hooks on each S hook, so I can store quite a few patterns this way. I haven't gotten all of them up there yet...baby steps...

The cubes that I use to hold up my sewing table (cubes from the recollections collection at Michael's and tabletop from Ikea) are great for organizing all kinds of sewing items. I originally bought them several years ago for scrapbooking storage, but when sewing started taking over my time as my primary hobby, I made them into my sewing table base (I also use legs to add extra stability under the tabletop)

The drawers hold my cone thread and various other notions, all sorted and in their own drawers by category. I got all of those cleaned out and organized so I know where everything is. On the top of the table, behind my machines, I put a thread tower to keep my regular sewing thread organized, and a makeup caddy that I converted to a sewing notion caddy :) I also have a cup that my daughter made at school that holds some scissors and other items I like having close at hand.


I also found some really cute wire storage bins in the dollar section of target that I used to organize my rolls of interfacing (I also used one in the top of the Ikea cart for my embroidery stabilizers, pictured below)
Other than the dollar section wire bins, the only thing I bought during this project to reorganize my room was the metal peg boards that I added above the storage cubes I moved into the corner. They are also from Michael's and they hold my scissors and rotary cutters, plus my embroidery hoops and some other various notions. My other embroidery supplies are stored in the top of my Ikea cart and in the drawers under the peg board.

Once I had all of my organizing done, I did a little accessorizing! I had these little white frames that I bought from Ikea a while ago and they were sitting empty, so I broke them out and make a couple graphics to go in them and added them to the wall. I love them!


I also decided to make a quick cover for my bright green chair. I originally bought a chair from Amazon, but when it came in it wasn't true white and I just didn't like it. I had the green chair and I hated to just get rid of it so I thought hey-I am a crafty gal, I can figure this out! I returned the off-white chair to amazon and then grabbed a yard of brown and white dot knit from my stash, my scissors and started cutting and sewing. About 25 minutes later I had a perfect match for my room. I am so happy with how it turned out and I used up a piece of fabric so now I can fit another one in that cabinet...just kidding...kind of.

So that's it! I have a few more things to get done, some items to destash or donate and a few more craft projects to get the final touches on the room, but overall it is done and I am thrilled with how it turned out. Now it is a calm and creative space I love to be in and lessens the stress in my life instead of adding to it. It's a great way to start the new year and now I am ready to get busy sewing in it (and hopefully cleaning up after myself EVERY SINGLE DAY!!!)
Sarah


