Camera Bag Conversion
/
Camera bag Conversion tutorial by Sarah.
Read More
Pattern Revolution Blog- PDF Pattern Sales and Promotions, Free Sewing tutorials, techniques and advice.

There I was, happily serging along, trying to get one more outfit done before leaving for vacation, when all of a sudden I heard that dreaded sound, "crunch!" Ugh, I ran over a pin, AGAIN. It doesn't happen often, but when it does, it isn't pretty...you probably know exactly what I mean. This time it was especially ugly, because instead of using my awesome ultra thing quilters pins, I had a few cheapies mixed in there, and they don't snap right in half like the good ones do, in fact, my machine came to a grinding halt and my handwheel was jammed. BAD. After a few cuss words and a sprained thumb, I was able to work it free and remove the carcass that was jamming my machine, but it just wasn't cutting the same anymore. GREAT! I nicked my blade.
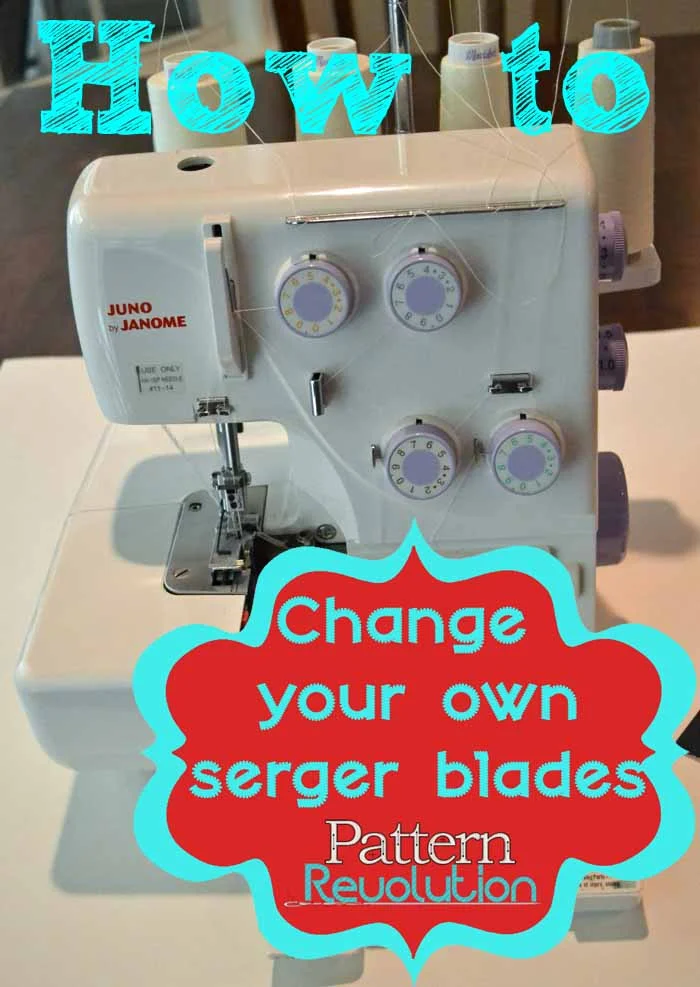
At first I wasn't quite sure what to do. I called my local dealer, $100 for service and new blades. Ugh, there goes my vacation money! After taking a closer look at my machine, I decided to use Google to find a part number because I can remove 3 screws on my own and I knew the parts had to be available somewhere. I stumbled upon Ken's Sewing Center and after asking around in some of my online sewing groups, I found that they had a great reputation, so I decided to give them a try. Their website was easy to navigate and I easily found just what I needed to fix my problem. Within a week, I got my parts in the mail and set to work. I took less than 10 min to change my blades, saved me a lot of money doing it myself, and my machine is as good as new!
The first thing you need to know is when to change your blades. Each manufacturer has their own recommendations for each model, but to be perfectly honest, I was LONG overdue according to my User Manual and my machine was working just fine. So, how do you know when it's really time? Well, the same way you know when a pencil needs sharpening, or your scissors are dull, it's just not the same! If you can't cut through multiple layers with ease, if your machine keeps jamming, or your scrap keeps getting caught up in your threads, it's time to change blades.
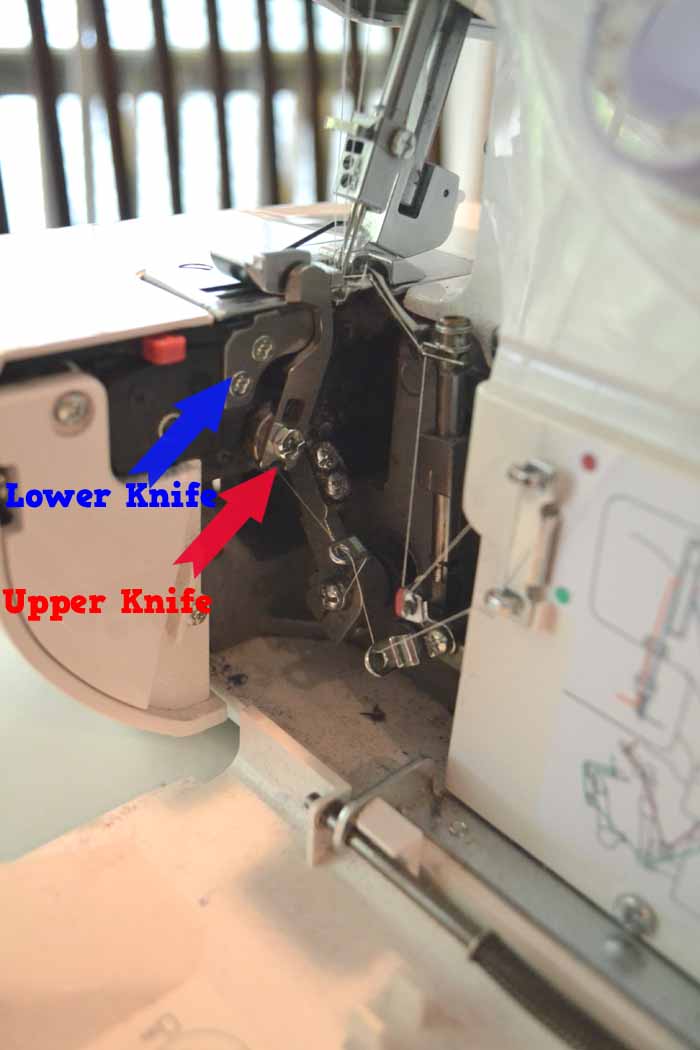
Next you need to get friendly with your machine. I have a Janome 3434D. Take a look at your blades, they may look different than mine.
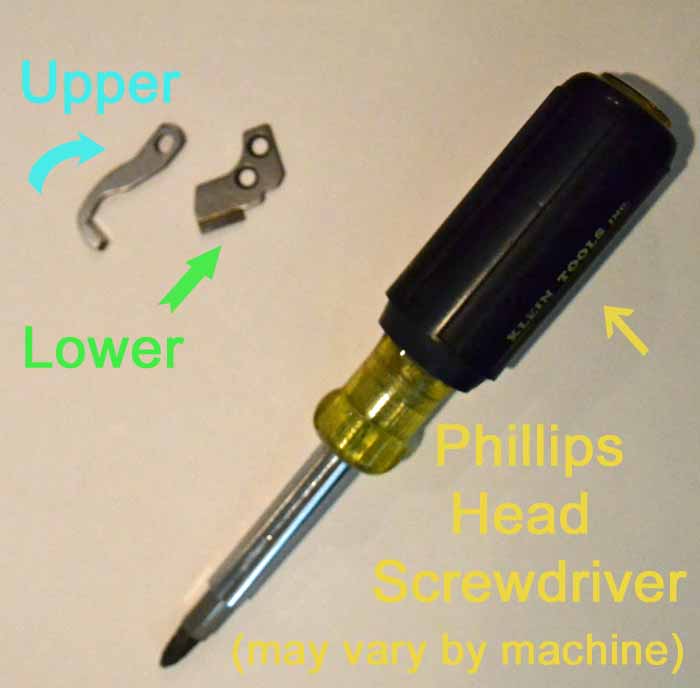
Next, get your tools and spare parts ready.
Make sure your machine is off and unplugged. Disengage your upper knife and find the screws for the lower knife.
Yes, it really is that easy! I swear, it took less time to change the blades than it takes to thread the darn thing! Before you turn it on and start serging, turn the handwheel slowly several revolutions to check to see if you have properly installed the blades.
You don't want your upper knife too tight or too loose, and it has to be at the correct angle to the lower blade and foot plate. Once you've made a few revolutions by hand and all is well, turn on your machine and test it out on some scrap, make adjustments if needed.
I hope you found this tutorial to be helpful! Be sure to share it with all your sewing friends, and definitely to go "Like" the Ken's Sewing Center Facebook Page, and let them know Pattern Revolution sent you! They offer sweet deals on a regular basis on everything from sewing machines to accessories. Sign up for members only specials HERE. You can get 10% off an order now using code: k1213, and you can also get free shipping on orders $39.99 and over. SWEET!
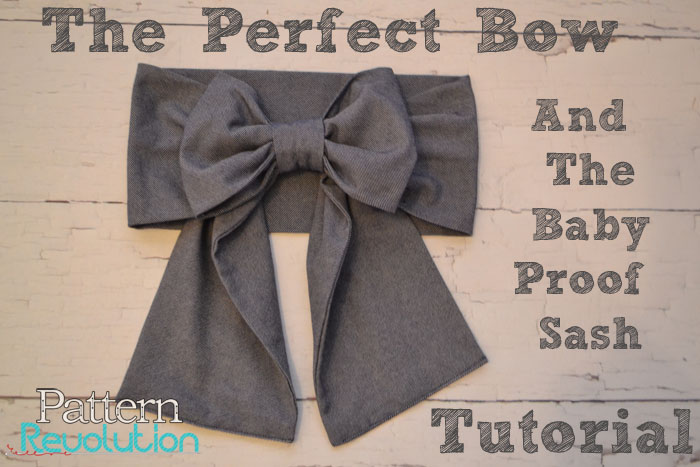
Every morning it is a struggle to dress my feisty 2 year old. All her pretty sashes hang untouched in the closet, while the dresses they go with get worn over and over. I love the look of a pretty bow, but my baby wont hold still long enough to tie it nicely, and in the miraculous event that she does, she unties it and removes the sash a few minutes later. GRRRR!!! Tell me I'm not the only one with this problem???
And so I fiddled around in my sewing room and came up with just the right answer.
There are 3 pieces to the baby proof sash. The Bow, the Bow Center, and the Sash.
Supplies: Sash and bow fabric, thread, sewing machine, scissors or rotary cutter, needle Kam Snaps and snap pliers. Kam snaps, by the way, are my FAVORITE things for garment closure for my crazy toddler. Fast and easy, but still secure.
First, you need to determine your sash length and width. Measure your child's waist while wearing the garment, add 2" for sash length. Decide how wide you want the sash, double that and add 1/2". Cut your sash.
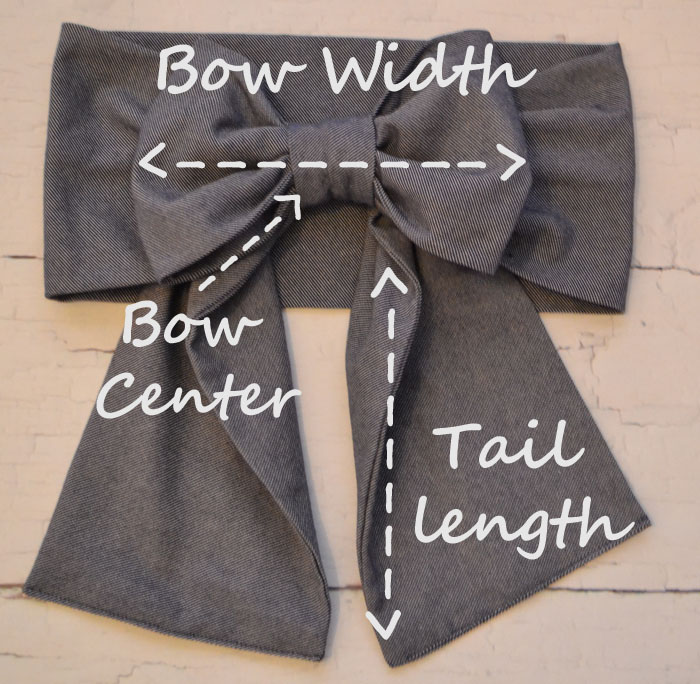
Then, you need to determine the bow width and tail length that you like.
This is all a matter of preference, and you can experiment until you find the bow size you like. Some people like big floppy bows, others like neat and tidy little bows. The bow portion of the sash is one long strip. The width of the strip should be the same as the width you chose for your sash. The length should be the bow width x 2 plus the tail length x 2. Cut your bow strip. My bow here was 14" wide (yep, that's a big ol' bow!) and 45" long. (Tail length 13" X 2 + bow width 9.5" x 2 = 45")
Your bow center is going to be 6" long, but you must decide how wide you want your bow center to be. Just eyeball it, you really can't go wrong. Then double that number and add 1/2". Cut your bow center 6" long by width x 2 plus 1/2" .
Cut your sash strip and your bow strip according to the above directions, then fold right sides together along the length.
Set sash aside for now.
Pin bow ends closed. Then fold your bow strip in half lengthwise with the fold on the left, matching up the ends.
Lay edge of sash on the bow width line and stitch down using a straight stitch, making sure to backstitch at beginning and end. This closes the 1 sash end and attaches it to the bow.
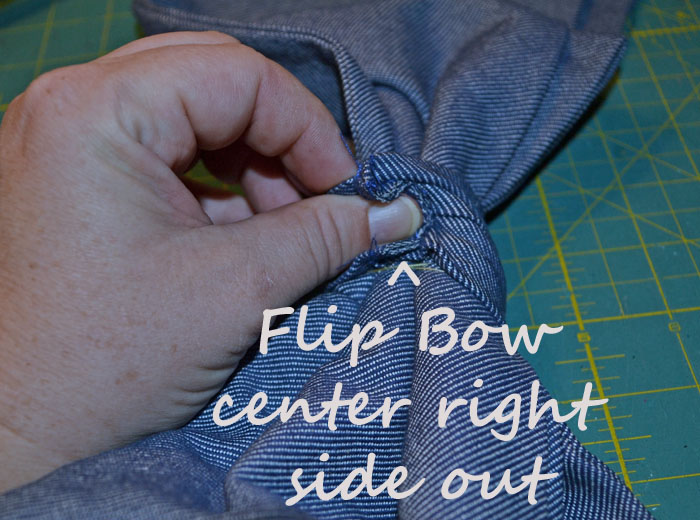
Time for a tiny bit of hand stitching.
Time to make the bow center.
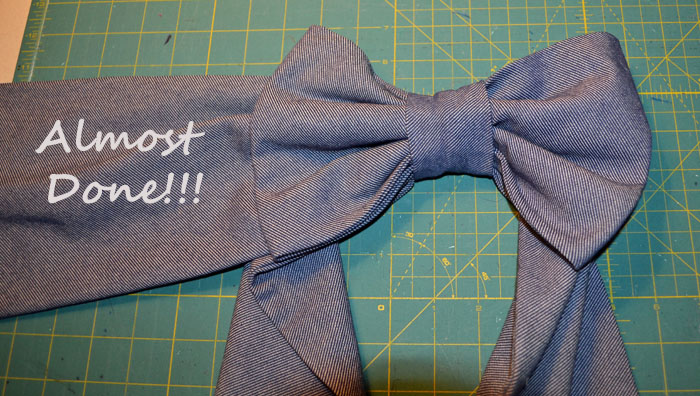
That's it! You did it! Snap it on your baby girl. No tying, no nothing. Snap and go!
Dorothy Day Tripper Pattern by Paco Bean. Click the photo to read a review of this pattern written by Ali Cat & Co.
Piping is the perfect little detail to really make your designs pop, and Alicia of Paco Bean Patterns was nice enough to stop by to give us all a little lesson on how to make our own piping. Sure, you can buy it in the store, but how much cuter is it to be able to use whatever fabric your little heart desires?
Enter the FUN giveaway at the bottom of the post to win a pack of Paco Bean patterns to pipe!


Want to win your own Paco Bean Patterns to practice piping? Here's your chance! You can enter the Rafflecopter below by liking the Pattern Revolution and Paco Bean Pattern pages and to get 10 EXTRA ENTRIES add a link to the linky share of a youtube (or any public video link) of you saying this fun Tongue Twister: "Patty Piper picked a pack of Paco Bean Patterns to practice piping."
Hehehehe, if I can do it, you can too :)
OK readers, now that we have taken a small glimpse at physical storage of pattern pieces and instructions; lets take a look at the element that sets PDF's apart from patter patterns. They are DIGITAL! We love this because we can access our instructions straight form our computers and readers, we can print out pattern pieces in different sizes as we need them, and of course we can satiate our unending quest for new patterns with the gift of instant download! But there is a downfall of digital media - it can be lost. Whether through a crashed hard drive, an unexpected natural disaster, or a child's misplaced banging of the keyboard; these files need to be protected.

Lets start at the very beginning - a very good place to start. When you purchase a PDF pattern and receive the file (whether through instant download or e-mailed by the designer), you need to save it somewhere. You can choose any method of saving your files - but you do want to them into a designated folder. If you only have a few patterns, just create a new folder labeled 'PDF Patterns' and save them there. Have a few more? You may want to then make new folders under the main header of 'PDF Patterns' for each designer, and store each of the patterns you buy from that designer there. Have a TON of patterns? Well you may just want to divide by type (shirts, boys pants, dresses, girls tops, etc..) and then within each of those categories have a folder by designer. WHEW! No matter what you method, just make sure they are saved in a designated space... it will make protecting them that much easier!
As a professional photographer, digital storage and backup is essential to my business. Luckily my husband is in CSE and very proactive in protecting my livelihood. I have back up hard drives, the cloud, and two other internet based backups of my files. I once had two hard drives crash in a month... thanks to my hubby I didn't lose anything.
Today we have Raedene and Melissa here to share a few back up methods using flash drives and external hard drives. Tomorrow we will look at free backup options available on the internet!
----------------------------------------------
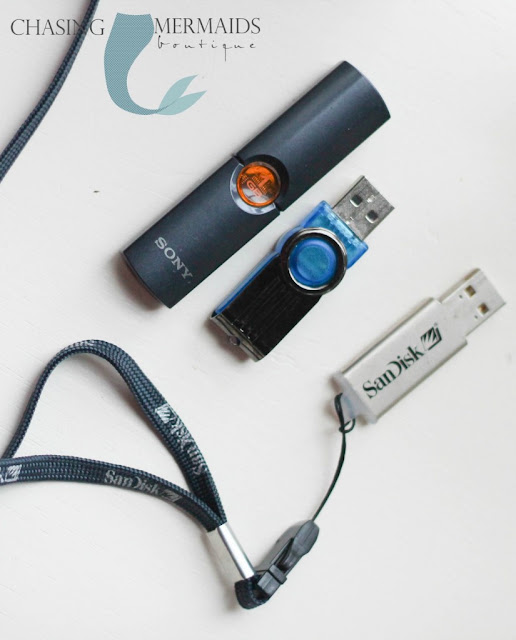
My name is Raedene, and as a seamstress in a sewing business I purchase LOTS of pdf files of patterns. I now, after 2 years, have a system. I save the actual PDF in many places. First, I download to my hard drive. I organized all my pdfs into folders by designers onto my desktop. Easy to find! Then I save to DROPBOX (Which we'll discuss in detail on the blog tomorrow). Finally, it goes to my external hard drive and finally to a USB stick. The external hard drive is a device that plugs into your computer with a usb port. You just send the file to that drive...and there is stays: SAFE. I also back up onto a USB stick. I have many: one for sewing patterns; another for applique designs; and one for monogram fonts. That way they don't get mixed up.
I learned the hard way a year ago how important backing up files is to protect them as well as one's investment. I had a computer that crashed. I didn't want to invest the money get it fixed as it was so old, BUT thankfully I had SAVED all the pdf patterns to my sweet little pink stick. Well guess what?? I have 3 kids and I have to be honest NEVER ever put anything back where it belongs....and it disappeared. I was devastated. They were not saved anywhere else. HOWEVER, this was in the day before all the designers switched to auto download where you receive a link and it expires. I had them ALL saved in EMAILS. Even the designers who has sent me the links didn't expire but gave me a number of times to download . I hadn't met my quota so I retrieved them all!! Well at least I think I did. Now I am ever more careful!!! I recommend you too be as OCD as me!!

----------------------------------------
Thanks for having me today, my name is Melissa and I want to share a little more information with you about using external hard drives.
An external hard drive is an easy and straightforward way to organize patterns. An external hard drive plugs into your computer, usually via USB connection, and while it’s connected to your computer and has tons of storage space, it remains unaffected if something happens to your hard drive (virus, hardware failure, etc) You can keep a copy on your computer and a copy on the external hard drive, or if you’re lacking for storage on your computer the sole copy can remain on the external drive. An added benefit is that if you use multiple computers, or a desktop and a laptop computer, you can plug the external drive into any computer & have all of your patterns at your fingertips! I choose to have a folder devoted to patterns, and within that folder have a sub-folder for each designer, and an additional folder or two for tutorials and such. This method also helps while shopping because
you can pop into your folder for the designer you’re shopping and make sure you don’t already own the pattern! (not that any of us own enough patterns that we’d forget, right!)
---------------------------------------------------
Thanks Raedene and Melissa! Now go organize your digital files and figure out a method that works for you to back them up. As always - if you have ideas, we'd love to hear about them, so leave us a comment!!!
Welcome to Pattern Revolution! We're a collective of women focused on encouraging and educating the modern sewist. Our team is made up of moms, shop owners, hobbyists, and masters of the trade. Our skill levels and project interests may vary, but our love of electronic PDF patterns are the same. Read more about the future of sewing patterns, or dive right in and let our posts inspire you

Disclosure of Material Connection: Some of the links in the posts on this site are “affiliate links.” This means if you click on the link and purchase the item, Pattern Revolution will receive a small affiliate commission. These commissions help keep the lights on at Pattern Revolution and we appreciate all of our readers for using them to purchase when possible. A complete list of our affiliates can be found on the "Sponsors and Affiliates" page. Pattern Revolution also receives a copy of the patterns featured on this blog free of charge. All reviews and options are the those of the reviewer alone and they receive no compensation for their review. Pattern Revolution only recommends products or services we use and believe will add value to our readers. Pattern Revolution is disclosing this in accordance with the Federal Trade Commission’s 16 CFR, Part 255: “Guides Concerning the Use of Endorsements and Testimonials in Advertising.”


![image[1].jpg](https://images.squarespace-cdn.com/content/v1/5174831ee4b084de2911741b/1371231088555-1NJKUE0SFAQ61WH0Z1LN/image%5B1%5D.jpg)

Use your Cricut Maker 3 to craft a personalized Halloween welcome sign.