
Let's learn Free Motion Applique! Tips and Tricks of the Trade
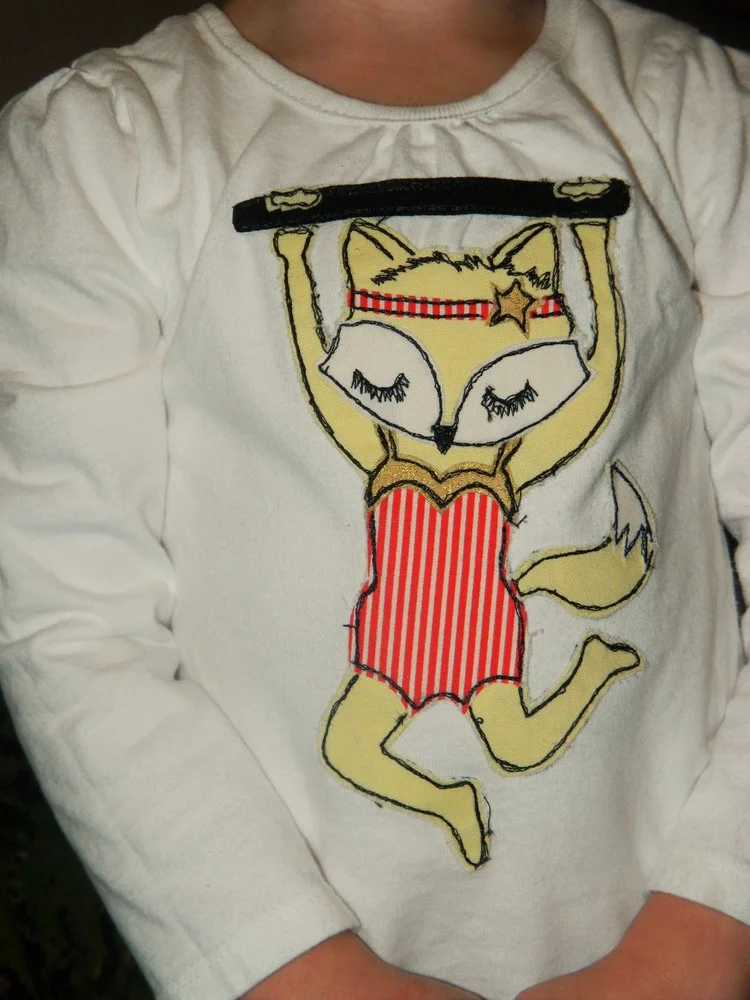
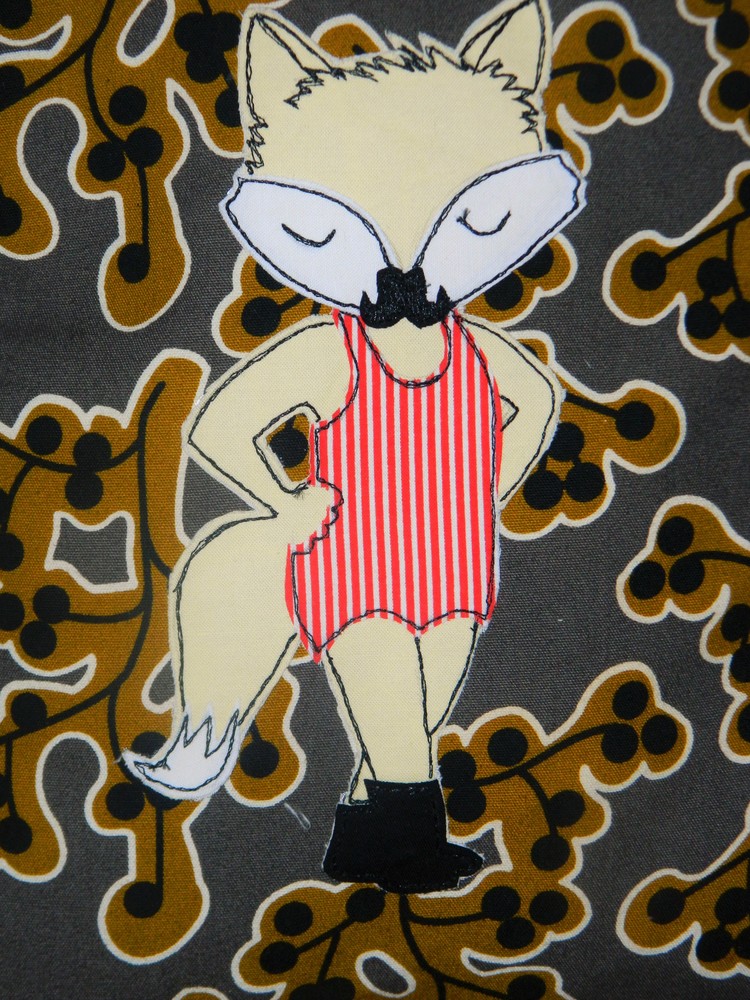
/Did you see the awesome new edition of One Thimble that released yesterday. You can read a bit about it in THIS POST and check out the whole release blog tour!!! Now if you are anything like me, you probably swooned over the new Free Motion Applique designs from Rick Rac and Retro. Those little circus foxes - I mean seriously, can you get any cuter?????

So we decided it was high time to give you more tips, tricks, and resources for where to fulfill all your dreams and desires in creating your own FMA amazing-ness! Here is Nicole to give you the low down....
--------------------------------
Have you been wondering what this this up incoming new trend in sewing has been? Free Motion Applique {FMA} This has been around for a long time, but has been coming up recently with a lot of new designers making their mark on this amazing art-form. I have been asked to share what FMA is and how to make it your own!
Before you begin, here are some helpful tools and advice that will help make a huge difference in how your FMA design will end up - and if you are going to put the work in, you want it to be awesome, right!
Darning/ Quilting foot. This is your free motion foot that looks like this. I purchased mine from ebay. You can also go to your local sewing machine shop and buy direct from them.
I love using these small applique scissors they are have a smaller tip and can get all those threads more precise than the longer shank scissors. That is a personal preference.
Good quality thread!! FMA doesn’t take too kindly to el cheapo thread. You will discover quickly that if you don’t use good quality thread your FMA stitching will look sloppy and messy; and you don’t want that. The thread is what brings your FMA to life. You will notice most FMA is done in Black thread. This is to give it more of a sketch like appearance. If you personally don’t like the black I have used colored thread that matched or contrasted each of my fabrics and it turn out beautiful. {I've included what that looks like in my post}
Interfacing: You will need tear away stabilizer and you will also need heat n bond lite.
Muslin: I use light cream or white. Very thin { I’ll explain why you need this further down.}
Wovens: This is where the creativity comes into place. Mix and match different skin tones, patterns, solids to make your FMA one of a kind. Piece prints together to add more style and flair to the clothing portion of your FMA design.
Make sure your bobbin is FULL when starting {If it is half full or even less you will see looping when you get done stitching}.
Make sure you have a CLEAN MACHINE!! {Take the time to make sure all the fluff is off your feed dogs, machine is oiled in the places it needs to me} I learned the hard way as my stitching was all over the place and looked sloppy and looping. The reason was because my machine wasn’t clean and my bobbin wasn’t full.
Drop your feed dogs {You need to make sure you do this if not your feed dogs will be moving your fabric around. By having them dropped you will be in control of all the motions you make as you stitch.}
For this post I will be showing Suzanne of Winter Wear Designs and Sarah of Ric-Rac & Retro . At the bottom of my post I have listed several FMA designers I didn’t showcase, their groups, and some freebies I found. Also in Suzanne’s Face Book group, she has freebies so if you want to get your feet wet in FMA you can try out her style. Some of the other groups also listed have freebies as well. So please check them out and support them.
What I love about FMA is the freedom to bring a simple design to life by adding in all your stitching. It is a fun way to add special to your sewing designs. You can add FMA to anything. Clothing, toys, backpacks, ect… The possibilities are endless.
Let’s get started!!
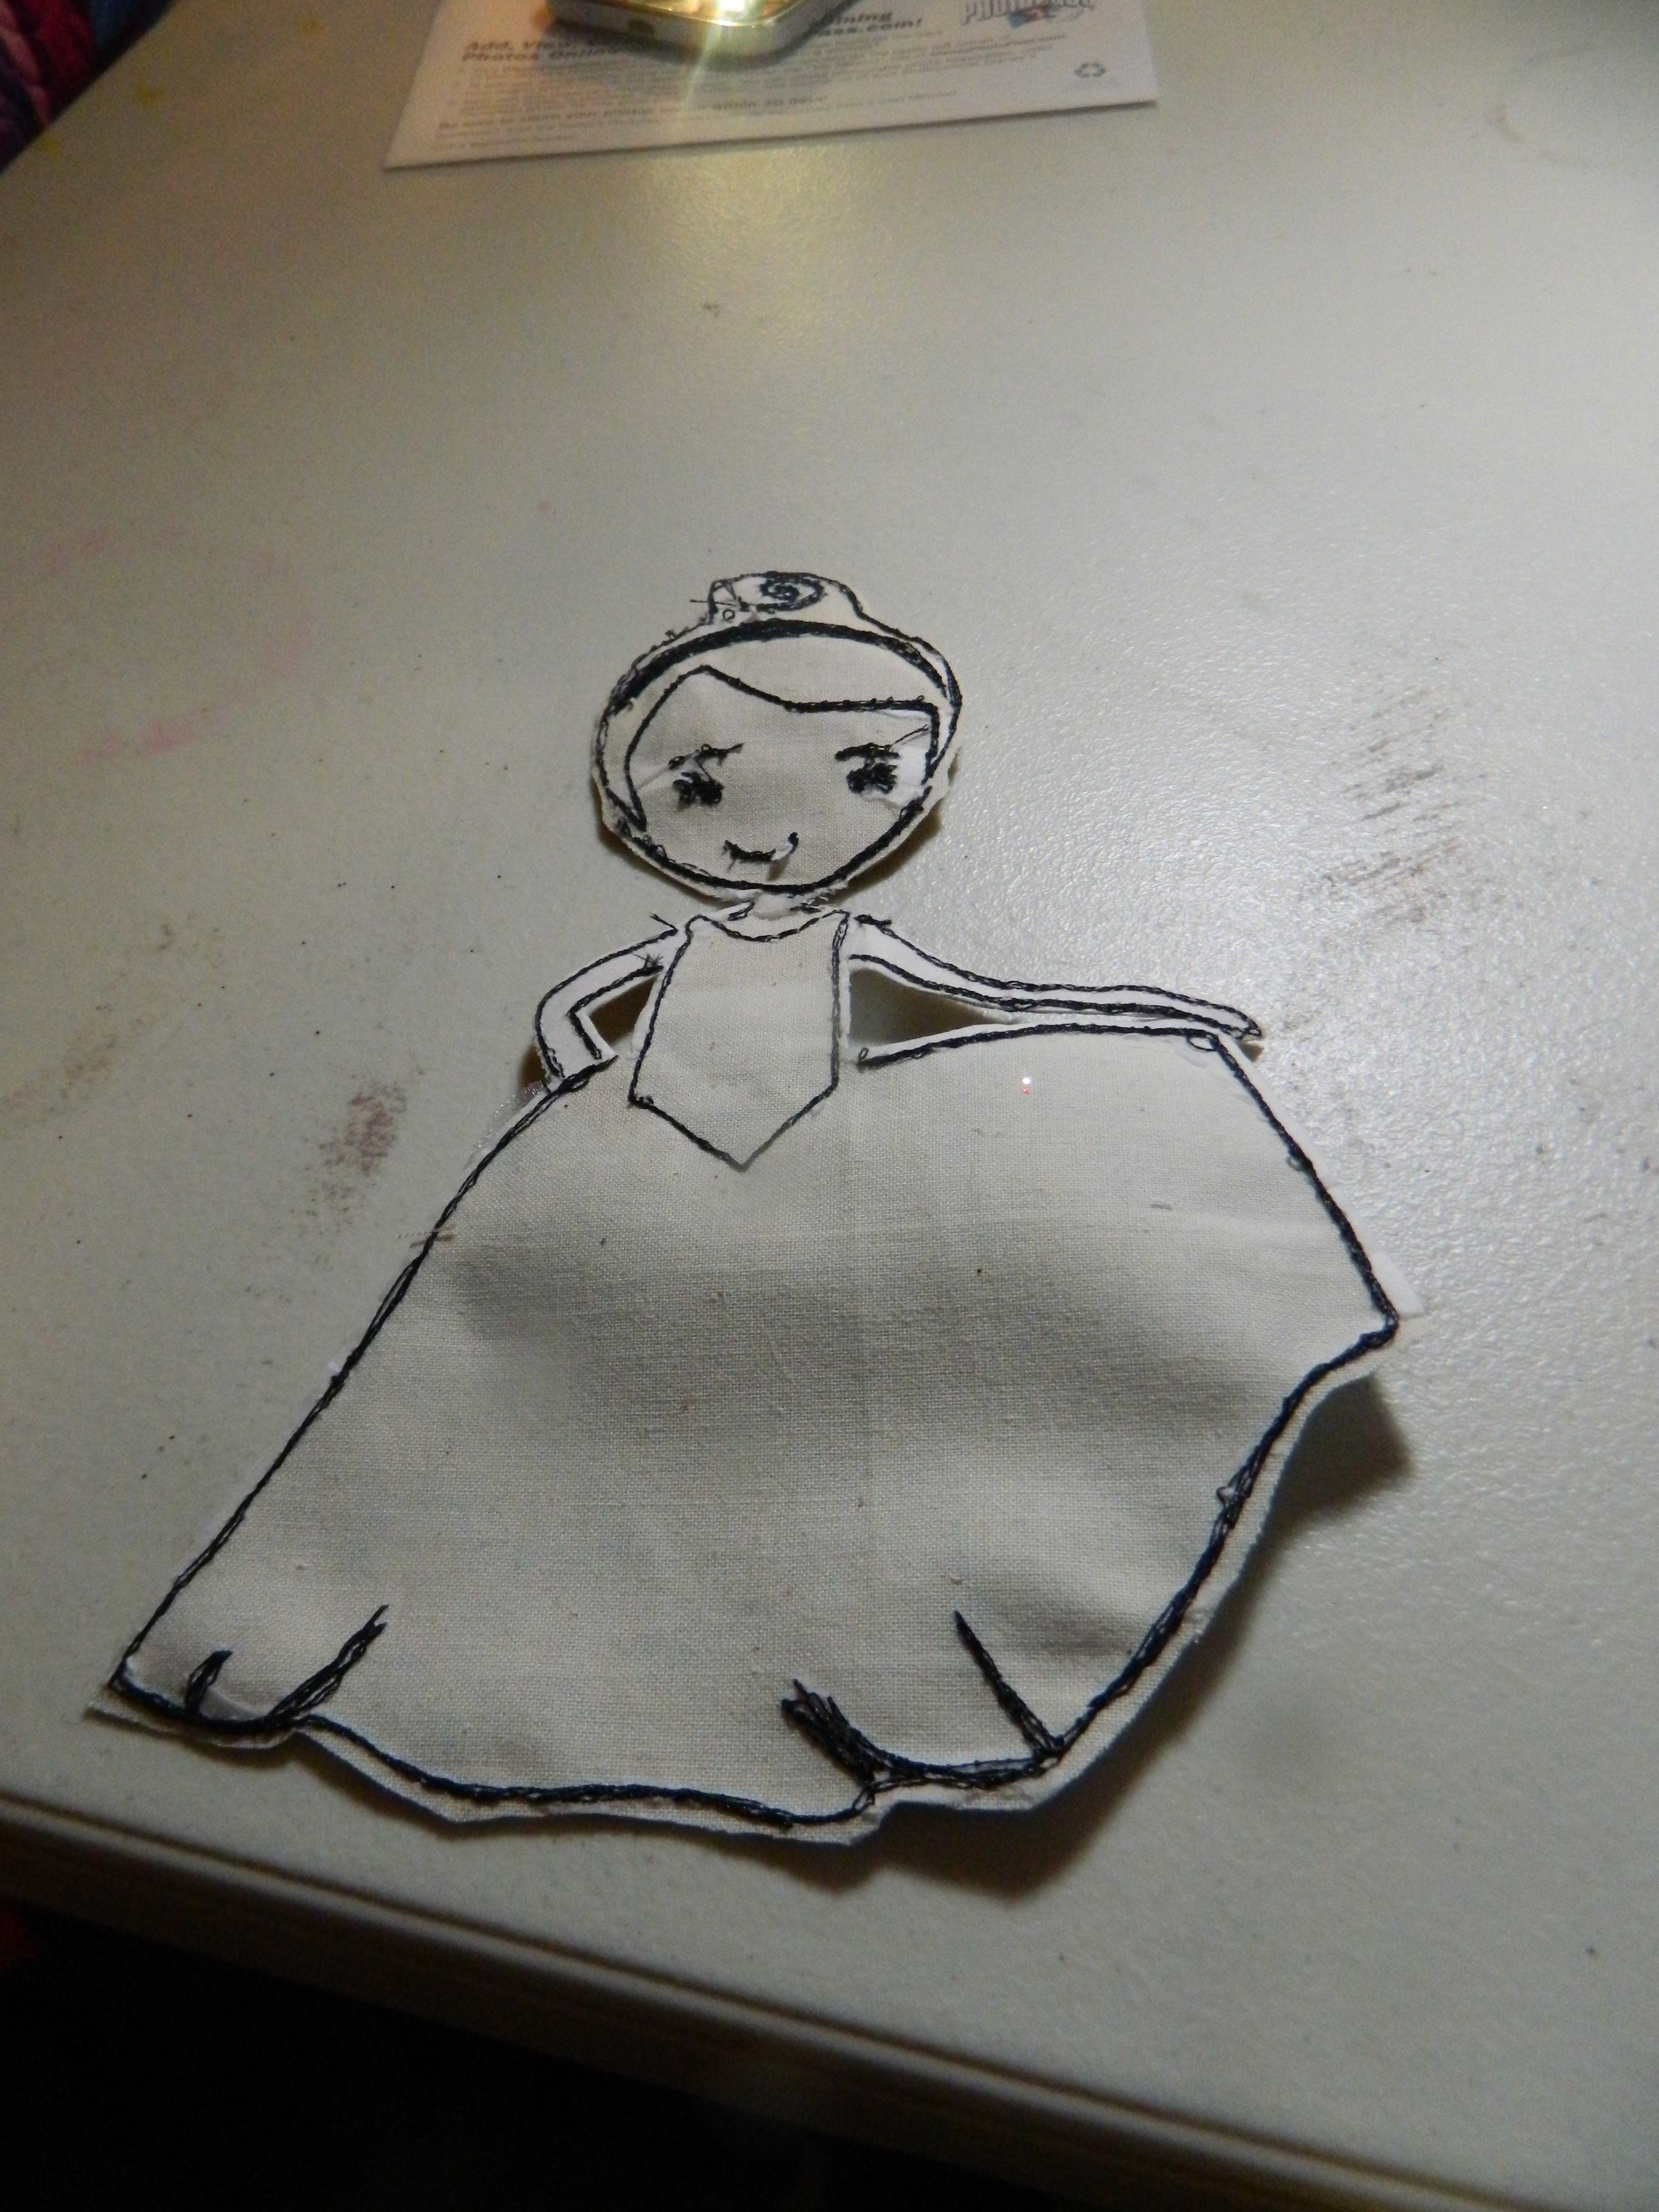
I used the Princess design by Winter Wear Designs for my tutorial. I wanted to add my own flair so I decided to make her dress into a 2 piece and did a V shape bodice by following the drawn line on her design and making it more pointy. I also added a 3D element with the peplums - so easy and so fun to customize the look.
You will start by tracing your design on heat n bond. I like to tape my outline to a window or door for easier tracing.


Then cut away some of the heat n bond and put it on the color of woven you have picked out for each piece. **Before you add the heat n bond to your woven please make sure you have pressed your wovens out so there free from any wrinkles. If not that will cause issues once you put your heat n bond to your woven it won’t be smooth and it will show.**
Once you have your heat n bond attached to your fabric, you will cut out each of your pieces. Peel off the backing on the heat n bond then you are ready for you muslin woven.. This will help add support to your pieces when you attach them all together for the first time. You will need heat n bond again at the very end.
This is the point where you see your FMA take shape by layering all the pieces. Once you are at this point you will go back to the main drawing that is included in most FMA and add all the lines that will bring your FMA to life. I once again, like to tape this page to a window or door to trace. Here you will see why I really love using the light cream that is very thin weaved it makes it easier to see the lines you need to trace.

I used MM fairy frost {dress}, Tan Kona {Joann} Yellow woven {Joann}


*This isn’t a must do but, I find this step important to making your stitching really pop. I love to create my stitch line by tracing around my entire project so I know where to line my needle when sewing. It makes it stitching more accurate and even. It only takes an extra minute and you will notice a difference by skipping this step. *
Now you will take your tear away stabilizer and either baste stitch or spray baste stitch the tear way to the muslin that has your FMA on it. **DO NOT SKIP THIS PART!!
Every machine is different when it comes to FMA so I suggest you grab a scrap of muslin that is backed with tear away and play with your stitch length. Mine is set on 0 for the stitch length my tension I leave as is but, you might have to adjust yours. I also change my stitch speed again, that is optional but, after doing several FMA I have noticed a difference my changing that.
I love to start stitching with my needle down rather than up {personal preference} Start stitching, I love to go over mine at least 3 times you can do more if you want a thicker stitching line. Take your time and go slow for the first line that you set. After your first line is in place, you can pick up speed for your repeating lines. It will take time before you feel the rhythmn you need I am still finding my groove. I go slow taking my time. Practice makes perfect.

Before I stitched the bodice of my top down to the skirt I grabbed some organza and made a mini peplum. I simply tucked the peplums under the bodice then stitched them down. I love adding 3D elements to FMA as it helps add more movement to the design. To prevent the design from fraying, I grabbed some fray away and sealed my edges.


You will continue to stitch until you have completed all the design elements you want to add to your FMA.

Once completed, you will carefully tear away the stabilizer from the muslin and stitching. Add more heat n bond to the back of your muslin, making sure that your heat n bond completely covers the area of your design. Trim the muslin around your design and then peel off the backing of the heat n bond. You are now ready to add the FMA design to your project. Once you have ironed the degin in place, you will sew over the outline again to permanently attache the design to your sewing project.
Here are some more examples of FMA
For this FMA, I used the Superhero Girl to create this Wonder Woman inspired FMA. I added 3D elements by adding a sequin rope and a tulle skirt.

For this project, I used Sarah of Ric-Rac & Retro’s Alice design. This time, I used colored thread instead of black.

I hope you join some FMA groups and give it a try!!!
Free Designs:
http://artbellacreates.com/2015/08/25/free-motion-applique-free-design/
Suzanne: Winter Wear Designs { https://www.facebook.com/profile.php?id=918196014871086&ref=br_tf }
Sarah: Ric-Rac & Retro { https://www.facebook.com/profile.php?id=112539605559645&fref=ts } { https://www.facebook.com/profile.php?id=607897629321206 not sure if she wants members here }
Jeanine : StitchArt { https://www.facebook.com/profile.php?id=1481201152191362 }
Designers I found on Etsy:
https://www.etsy.com/shop/made4bug
https://www.etsy.com/shop/FluffyRainbowDesigns
Youtube tips and tutorials:
https://www.youtube.com/results?search_query=free+motion+applique
Lots of good videos if you want more visual. Helpful advice for stitching, setting up machines, ect...
Have fun stitching!!
~Nicole~


